Block Party - March

For March of Block Party, Kristen gave us a really great challenge. She posted this photo and asked us all to come up with the answer. quiltplan

Needless to say, it took lots of thinking before I got started. I knew I wanted to include curved seams but also the log cabin feeling. We're all making two blocks so I had to come up with the solution to the equation twice!

Here's the first block that I came up with:

Block Party - March

This was the first time that I've ever done curved seams and clearly they aren't perfect... Things got crazy with me making templates and everything!

Making templates

And the second block that I made:

Block Party - March

To me it kinda looks like there's a little tv in there. Didn't do that intentionally...

I'm pretty pleased with them.  Especially individually.  Together I wonder if they "go" but I hope that they will mix in with all of the other blocks just fine!

Block Party - March

Hope that you all have great weekends!

Yet another purse

Recently I've been getting a little thrill out of making projects that you can finish in one sitting. Quilts certainly don't provide that, but cute purses do!

Linen Purse

This one's from the same pattern as the last red one I made. It's really a great little pattern. I often struggle with handmade purses looking... well... handmade. This pattern really doesn't have that vibe to me.

Linen Purse - Inside

I'm going to have to buy more Hello Betty the instant my fabric buying ban is lifted. I really love it so much. To me it's the perfect mix of modern and pretty.

I'm out of magnetic snaps so I'm improvised by adding a button. I think it's a cute touch!

Linen Purse - Button detail

I'm not much for linen in my quilts, but in purses?!? It's perfect. Love. Love. Love.

Two Baby Coin Quilts

All done with these coin quilts that I made simultaneously.  I enjoyed making them at the same time.  Since they are this small (34" x 46") it didn't feel like it took too long.

Two Baby Coin Quilts

I really love so many of the fun fabrics in these!

Baby Girl Coin Quilt - Detail
Baby Boy Coin Quilt - Detail

I didn't intend to do different backs, but after mistakenly I sewed the strip of patterned fabric upside down on the girl quilt, I thought, why not?!?

Two Baby Coin Quilts - Back
Baby Boy Coin Quilt - back detail
Baby Girl Coin Quilt - back detail

And some simple solid bindings. I have found that I really love solid bindings as a nice simple frame to the louder coin strips.

Simple Solid Bindings

Up next, two more baby quilts, also made at the same time!

More red linen

I'm loving linen.  Way back in this haul, I got a bunch of different colors and there was yards of it.  I was, needless to say, delighted.  I've been using the aqua here and there for awhile, but this red was recently rediscovered when I clean up my stash. A new purse for me!

Red Purse Wide

Made with this pattern. I modified it a bit - mostly in how I sewed on the handle strap. I included the handle in the step when you sew the lining and the outer shell together, rather then sewing it on at the end.

Red Purse Close up!

And that pretty patterned fabric?? A fat quarter that I got in the Sew, Mama, Sew! fat quarter swap. I love it with the red linen!

Happy weekend to you all!

Baby quilts and a little linen.

Progress here... Coin Girl TopCoin Boy Top

Have even gotten them all quilted and am stitching bindings!

All Quilted!

And a friend asked me a for a little red pouch so I delivered! As I put it together with no pattern I was very pleased to realize that I have mastered my understanding of bag making and lining. It tends to take me forever to wrap my head around these things. I can follow directions and have it turn out right over and over but now I finally "get" it!

Simple little linen pouch

I love the lining fabric from the Hello Betty fabric line. Simple little linen Pouch

Solids & Squares Quilt is all finished!

I finished the quilt that I made for my mother. I really enjoyed putting it together. As I've mentioned before, working with different colors and so many solids was a wonderful push outside of my comfort zone.

Solids & Squares Quilt

I'm so pleased with it's combination of being modern design, but also simple and not loud.

Solids & Squares Quilt

For the back I did mostly blue with a strip of warm reds and browns - all fabrics that are in the front.

Solids & Squares Quilt - back

And I'm so happy with the binding on this one too!

Solids & Squares Quilt - binding detail

I'm not usually drawn to batiks, but this simple one that my mother has told me is her "favorite fabric ever" works perfectly to add another small nice touch to the quilt. Can't wait to give it to her when she comes for a visit later this month!

Coins

and coins and coins!  Keeping busy getting started on some very simple stacked coin quilts.  I'm going to make two at once... One for a boy and one for a girl.

Coins

I love working with so many fun, bright and bold fabrics! It makes me happy.

Coins close up

And a gratuitous cat photo just 'cause.  She is as tiny as she looks.  I lucked out and got a perma-kitten.

Beans

Hope that you all have wonderful weekends!

So many solids.

Finished up the top for the quilt I'm making my mother. All fabrics that she gave me to use.  Usually I work with many more patterns, but it's great to sometimes have to work outside of your norm.  I'm happy with it!

Mostly Solids

Using solids makes me think about shape and color so much more. Really fun for me. Can't wait to see this one come together in the next steps.

Mostly Solids

Another mail sack!

I was in a bit of a funk the other day and wanted to make something that would cheer me up.  What to do?  How about cut into some of your favorite fabric and make yourself a bag you know you love??  Done.

Echino Mail Sack

Those of you who have been reading my blog for awhile know that I love love love the Mail Sack pattern from Pink Chalk Studios (not to mention how inspirational Kathy's blog is!) so I figured I'd make yet another. I make the mini version so it's more handbag-y than tote-y.

Echino Mail Sack close up

Can't go wrong with this amazing Migratory Birds Echino fabric! I'd been holding off cutting into my little half yard of it, but making myself something with it sure did brighten my day. Sometimes you just need to take the dive and cut into the precious fabric!

Hope that you all have wonderful weekends!

A stash overhaul.

All these stash posts over at Sew, Mama, Sew! had me ashamed. That's right! I'm putting a face to the messy fabric out there!!  You're out there too, right? I feel like we see so many photos of beautiful stashes, but that can't be how it is for everyone...  All of us are creative types, aren't we supposed to be messy??   Right?  Please - help me out here.  You all have messy stashes sometimes too right??

I'm not a naturally tidy person. I'm just not. It's always a struggle for me to keep my things in order. That said, I'd let my stash get completely out of hand over the past couple of months. I'm embarrassed about it, but this is the state it had gotten into...

Before

And that's AFTER I gathered it all one place for the photo. Can you believe that the last time I thoroughly organized my stash it ALL fit in that tan bin in the upper right of the photo??  Yeah. That was a long time ago...

I read this incredibly inspirational post by Elizabeth and that was that. I HAD to do something about the horrific state of affairs.

First, a good sorting and refolding lead me to this.

After sorting

Then a trip to Ikea later and I had this!

Final Result

Yay! If you click through to Flickr on the photo you can see my notes of what it all is but basically, going clockwise... the basket is my scraps (for me they are very small), the clear bins are less than a yard, sorted by color.   Then there's my home dec. weight fabric & quilting weight solids, and lastly in the original tan bin, my cuts of a yard or more.

Clearly this isn't where it all lives in my sewing room, but the shelf it all goes on is tall and deep. There's no good way to get a photo of it all when it's put away.  Now I am organized!  Let's just see how long I can keep it this way...

Sparks Baby Quilt Pattern

A little while back, I mentioned that I'd be posting the pattern for  the Sparks Baby Quilt. Here it finally is!  I've learned that writing up patterns feels like real homework to me... no fun!  But I do want to start doing it more.  I feel like the more I do it, the easier it will get.

Let me preface by saying that I hope that this pattern works out for you.  It's the first quilt pattern I've written up and I'm generally not someone who follows patterns. I wouldn't be surprised if there's mistakes and/or confusions.  Please drop me a note or comment if you have thoughts or suggestions for changes.  Also, do let me know if you make the quilt!  I would love to see your results.

Ok - here's the pattern!

Sparks Baby Quilt

Sparks Baby Quilt

The finished quilt measures 46.5" x 60"

Needed Fabric:

Blocks - all of mine are different fabrics, but that's up to you! - 20 3.5" square centers - 20 frame sides,  3.5" x 6" - 20 frame tops and bottoms, 8.5" x 6"

Sashing - I used off white Kona cotton: - 15 strips of  2.5" x 8.5" - 4 strips of  2.5" x 38.5“

Border - I used off white Kona cotton: -2 strips of  4.5" X 48.5” for side border -2 strips of  6.5" x 46.5” for top and bottom border

CUTTING:

Let's do the easy part first.

Cut the sashing and border

Sashing & Borders cut out

Sashing: 15 strips of  2.5" x 8.5" 4 strips of  2.5" x 38.5“

Border: 2 strips of  4.5" X 48.5” for side border 2 strips of  6.5" x 46.5” for top and bottom border

Then, cut out the fabric for the blocks

Cut centers: -20 centers,  3.5" square.

For my centers I did lots of fussy cutting.   After measuring and cutting my first square, I like to then use it as a template for cutting out the rest of the centers.  Some people hate templates, but I find them helpful for fussy cutting.

Fussy Cutting

Using the template makes it easier for me to see which part of the fabric I want to cut out.  Make sure to use the same square as the template all along, and not to trim its edges as you go.  You don’t want the squares you are cutting to gradually change a bit in size.

Cut frames: - 20 frame sides,  3.5" x 6" - 20 frame tops and bottoms, 8.5" x 6"

Cut Fabric

Next, cut the fabric for the block frames in two.

I do it randomly, but first I lay them out and do some design planning before I decide which squares will be cut which way.  Here the fabric is stuck up on my (tri-colored, yes it's just three pieces of felt!) design wall so that I see how it will all look.

Design decisions

There are a couple of things I consider before cutting the fabric for the frames in two.  I wouldn’t want to find down the road that all of my oranges have the center in the upper right.  Or all of the blocks that I want on the left edge of the quilt have centered centers. That's wordy, but I hope you see what I mean.

Also, keep in mind that some of your blocks have a right side up (unless you didn’t fussy cut) – so you can’t flip them around later to change the position of the center.

If you aren't comfortable cutting the frames randomly, I have broken it down like this:

Block options

8 blocks - off set top & bottom, off set sides - Cut 8 of the 3.5" x 6" down to 3.5" x 2.5" & 3.5" x  3.5" - Cut 8 of 8.5" x 6" down to 8.5" x 2.5" & 8.5" x 3.5"

When piecing these 8 blocks put: - 2 centers in upper left - 2 centers in lower left - 2 centers in upper right - 2 centers in lower right

4 blocks - off set top & bottom, centered sides: Cut four  3.5" x 6" strips down to 3.5" x 3" and 3.5" x 3" Cut four  8.5" x 6" strips down to 8.5" x 2.5" and 8.5" x 3.5"

When piecing these 4 blocks put: 2  centers higher in the block 2  centers lower in the block

4 Blocks - centered top & bottom, off set sides Cut four of the 3" x 6" strips down to 3.5" x 2.5" and 3.5" x 3.5" Cut four of 8.5" x 6" down to 8.5" x 3" and 8.5" x 3"

When piecing these four blocks put: 2 centers to the left 2 centers to the right

4 Blocks - centered top & bottom, centered sides Cut four of the 3" x 6" down to 3.5" x 3" and 3.5" x 3" Cut 4 of 8.5" x 6" down to 8.5" x 3" and 8.5" x 3"

All four of these blocks are pieced the same way.

PIECING:

Piece all the blocks, randomly or as indicated above.

Ready to peice
Step 1
Step 2

Here are all of my pieced blocks:

Finished Blocks

Next, piece the sashing.

First attach the blocks to one another with the fifteen strips of  2.5" x 8.5" until they are put together in 5 rows.

Connecting blocks with sashing
Rows with sashing

Then continue by attaching all the rows to each other with the four strips of  2.5" x 38.5“.

Sashing 2
Sashing 3

Finally, piece the border.

Borders

First sew on the sides, the 2 strips of  4.5" X 48.5”.

Borders 2

Then sew on the top and bottom, the 2 strips of  6.5" x 46.5”.

Congratulations! You have a finished quilt top!

Finished Quilt top

From here, if you need to, check out this post for links on how to baste, quilt and bind!  Hope that you enjoyed the pattern!

Babies on my quilts.

I couldn't resist.  These photos have all shown up in the past couple of days... so it couldn't be helped. I mean, really, TWO sets of twins!  Oh how I love to see the gifts enjoyed.

Sam & Harry

Fay week 15 136_NEW

Molly&Bridget

The Bushfire Quilt project

Tia over at Camp Follower Baby Lady is organizing a lot of quilts being made for the victims of the fires in Victoria, Australia. It's such a quick and easy way for us to help out in our own way. She's having people make wonky stars which I'd never done and is so much fun and a great way to use up scraps! I might have to make more of them...

Stars

Please consider making some yourself ! Just head on over here for more details.

Flora & Fauna Quilt all finished!

And now you know the name I came up with for the biggest quilt I've made!  I think that it's perfectly fitting because there's lots of both flora and fauna in the quilt.  And that's it.  Don't have to dig too much to get to the meaning! Ha!

Flora & Fauna Quilt
Flora & Fauna Quilt

I have to say... I'm proud of this one.  I think that it's my favorite quilt that I've made.  I put this one together block by block and, to me, it really represents the progress I've made in my quilt design. Improvisationally pieced, lots and lots of different fabrics, and a balance with solids. These are all things that I've really worked on and have all come together in this one quilt. This one is going to be hard to part with! But it will be very near by and I will visit it often.

A quick mention 'cause the photos aren't really true... the dark solid is chocolate brown, not black...

Flora & Fauna Quilt

For the back I put together something that worked with the white fabric I had.

Flora & Fauna Quilt - back

This has to be the biggest log cabin block I'll ever make! It's huge!

Flora & Fauna Quilt - back detail

This quilt also reminds me how much I enjoy blogging and recording my progress. Back on November 5th of last year I posted this photo of fabric that I had pulled for my next quilt.

The next quilt

And here we are, three months later and (plus or minus some fabrics) it's finished. I really just find the whole process so rewarding and satisfying. From raw fabric to completed quilt!

Flora & Fauna Quilt detail
Lots of cuddly quilt

Starting new projects

Since I'm stitching on the binding of the huge improv quilt (I'm going to have to come up with a good name for it!) it was time to get started on a couple of new projects! First, I started some blocks for my mother's quilt. 6 down, 29 more to go!

Beginnings of Mom's Quilt

I'm really enjoying making these blocks in my usual improv way, but using colors and tones I'm not prone to pick . It's really fun to be both in my comfort zone and out of it at the same time. If that makes any sense at all...

Otherwise, I've officially fallen in love with spiderweb quilts. Ashley who's in Block Party! with me asked us all to make her two blocks. Didn't she pick amazing fabrics?!? Who doesn't love red and aqua.

Block Party - February

After making them I was so taken with both the process and the look, that I knew I had to make a quilt of them for myself.  I actually took the time to sort through all of my scraps before starting.  This block is the perfect way to use up the tiniest bits of fabric!

Spiderwebs

It's feeling a bit more chaotic than most of my quilts, but I just love it all the same. It takes me about an hour to make one block (I've only made four so far!) so this is going to be a long term project. And it's destined to be a lap quilt I think...

I've been using this tutorial if any of you would care to start making some.  But look out!  It's addictive.  Don't say I didn't warn you!

A little close up. I'll never tire of fussy cutting Heather Ross fabrics.

Spiderwebs close up

Hope that you've all had a great weekend!

Quilting

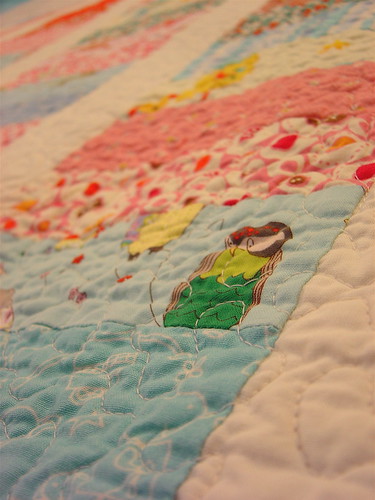
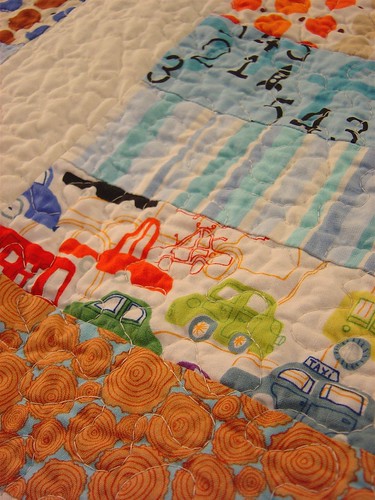
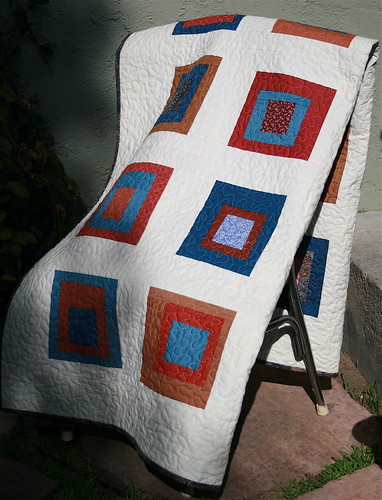
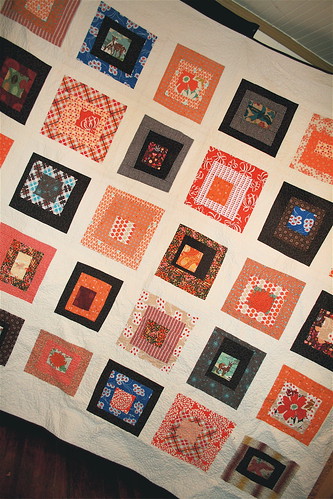
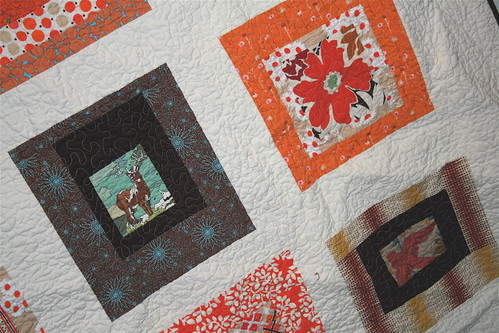
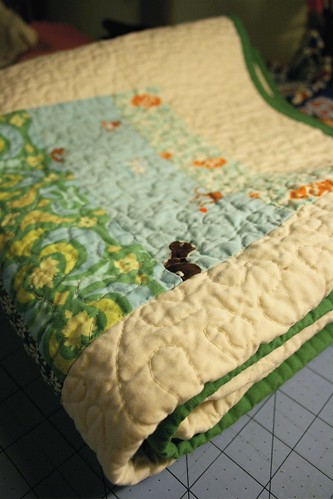
With my new visitors from Sew, Mama, Sew! I have been getting the same question quite a bit:  How do you do that "all over squiggly" quilting?  I do it on my normal little sewing machine, and you can do it too!  It's called free motion quilting - and that pattern is called stippling.  I'm certainly no expert, and there's lots of other info out there about free motion quilting, but I thought I'd type up a post, with all my thoughts and tips, to direct people to.

Quilting

First off, I want to mention that it's not that hard. I feel like before I did any free motion quilting, everything I read about it scared me off. People made it sound like it was incredibly tough to master.  But it's not.  It takes practice, but beyond that, it's something that anyone can do.

The nuts and bolts: you use a darning foot on your machine, and you put your feed dogs down.  From there, practice lots on quilt sandwich scraps before diving into your first quilt top.

Other things that help:

- Always set your needle to stop in the down position so that you can stop and start as much as you need to. -The key to even stitches is to find the balance between the speed you move the quilt and the speed of your needle. - For me, going fast makes my stitches more even - but from what I've read that's not the case for everyone. - If you run out of thread in your bobbin in the middle of your quilt, just keep going from the same spot, making sure to sew a few locking stitches over where you left off. - 
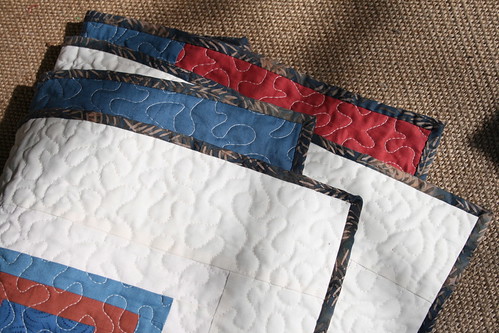
I check that the back of the quilt looks right A LOT. Tension problems often don't show on the front. - 
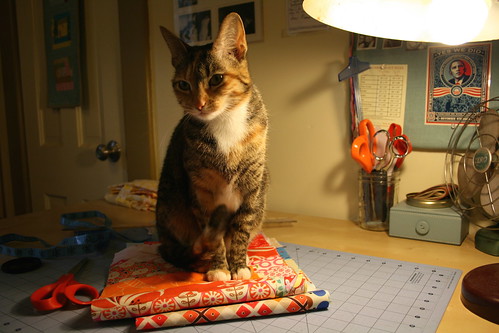
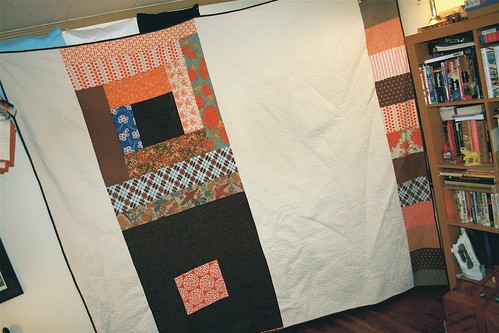
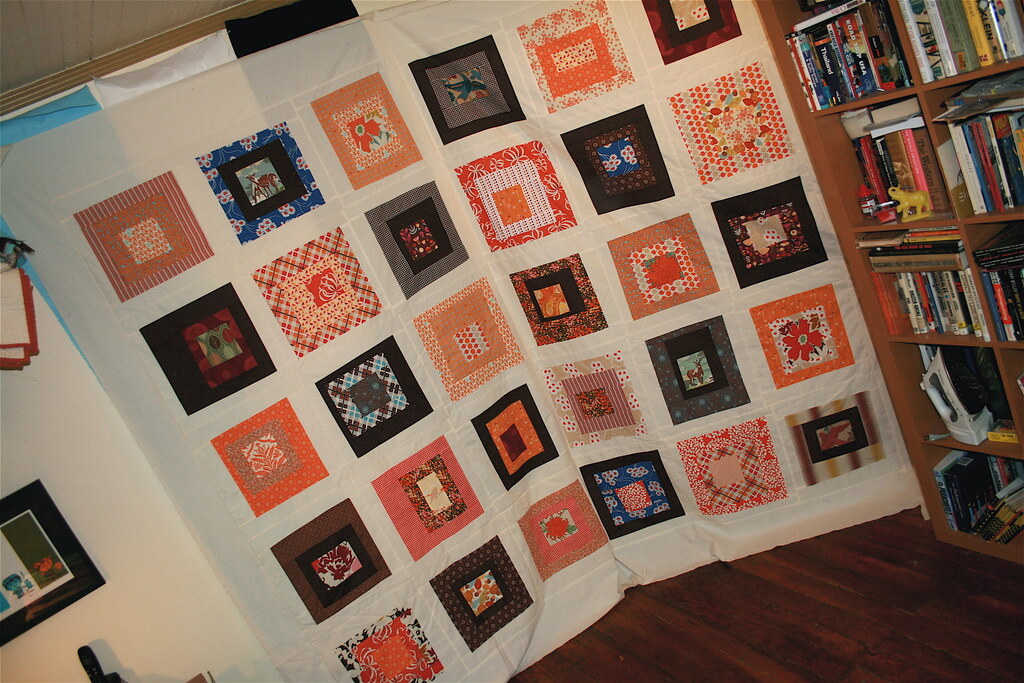
If you're quilting a big quilt, having a table to your left to hold the weight of the quilt is incredibly helpful. You can see what I mean in this photo.

Quilting

Beyond all that I've mentioned, there is an amazing flickr discussion here that gives you all the tips and tricks you could ever need. And Amanda Jean put up a GREAT video tutorial here. Both of those helped me a lot.

The other question that I'm often asked is how I organize my quilting... meaning, where on the quilt do I start and how do  I work my way through the quilt.  I have an incredibly tough time explaining it in words, so I did a drawing for you! Here it is:

How I Quilt

I hope that's clear! I don't start in the middle as is often suggested, but this seems to work for me. The first couple of quilts I stippled would get some yucky puckering in the back but now I pin LIKE CRAZY (I mean, I think I might OVER pin!) when I'm basting and that problem has stopped.

Quilting has come to be my favorite step of quilt making. I still get a thrill every time I sew over a seam and "unite" the quilt top a bit more. I love watching it all come together. It's so much fun!

Got the HUGE quilt top all finished!

It's big.  It's reeeeally big.  Right now it's 106" x 95".  My goal is for 104" x 93" when it's all washed so I went just a bit bigger... and it's BIG! But I love it.  I really can't wait to see this one all finished.

Finished HUGE quilt top

I'm a bit scared about tackling the quilting on my little sewing machine, but I'm just gonna go for it!!  First I need to make the back though.

Here's a couple of my favorite blocks in it:

Favorite Block 1

Favorite Block 2

Blue & Green + Yellow Baby Quilt

I just finished up another baby quilt. I'd mentioned before that this color scheme was requested so it forced me to leave behind the comfort of my orange or pink. I am so pleased with the results! I really find this quilt so vibrant and bright. I hope that it is well loved!

Blue&Green+Yellow Baby Quilt
Blue&Green+Yellow Columns

The back:

Blue&Green+Yellow baby quilt - back detail

And a detail of it all cozy and folded up!

Blue&Green+Yellow baby quilt - all folded up